Monday, December 26, 2016

2017 New Years Day Card


Rather than sending Christmas cards, a few years ago I started sending out New Years greetings cards instead. I think it started when I got so far behind in my holiday preparations that no cards were ready for mailing till after the holiday. This year, instead of making cards by gluing something onto card stock (as with the "Holiday Hearts"), I made cards using a photograph I took a couple of years ago of a garland of paper snowmen hung in front of a map of North Carolina. Thus the name of the card's design, "Snowmen Across North Carolina"...both a cute image and a bit improbable as it would be impossible to build snowmen across this state unless we had an unprecedented winter weather event that stretched from the western mountains to the eastern coastline.

On a technical note: printing these cards seemed to bring out all my latent dyslexia. I thought I would never get the photo positioned to print in the right part of the card stock even after many test runs on regular paper. After finally getting the photo rotated the way I needed it, I still couldn't get it to fit the dimensions of the card correctly. Using MS Word, I set the paper size to that stated on the package -- 5" by 7"-- but the photo was still not printing right. In one of those major "Duh" moments I finally realized that those dimensions were for the folded card, but I was feeding the card into the printer opened up to its full size: 10" by 7"... boy, did I feel stupid. Once I reset the paper measurements everything proceeded without a hitch. 

Note to self: I must never, never, never lose the file for this card as I know I will need it as a model for future cards unless I want to go through another 2 hours of figuring out how to do it again.

Monday, December 12, 2016

Tatted Little Holiday Hearts


As a quick gift I tatted hearts for three of my co-workers at the Ten Thousand Villages store in Cary, NC, where I volunteer each Sunday. This is  Rosemarie Peel's heart pattern and is available for free on the Ring of Tatters website. Over the years, I must have tatted this pattern well over 100 times. I love it because it works up fast and is mostly chains so very little thread is needed on the shuttle. Peel suggests loading the shuttle with 3 yards of thread, but I find that it takes about 2 yards for me.


I bought the thread in a little yarn shop in Budapest this summer as one of the souvenirs from my trip to Central Europe. The thread is Poppets Eldorado in green and red. I especially like it because, unlike other "Christmas-y" colorways, there is no white in it. I think the addition of white dilutes the strong visual impact of the complementary colors red and green. 

The label says it's a 16...not sure what that is comparable to in U.S. sizing, but it appears to me to be similar to size 20. It's a little fuzzier than Lizbeth thread, but it tatted up with no problems. From researching it on the web I see it is primarily sold in Europe as a crochet thread. There are 385 meters on the ball, so I'll probably be making many more pieces with it. 


By the way, I also made the snowflake sticker that attaches the heart to the card. I found some snowflake images on the Web and sized them to fit on a 1" by 4" Avery address label and then ran them off on my inkjet printer. 

Friday, November 18, 2016

Tatting at the Library


My fellow tatter Anitra and I displayed and demonstrated tatting this week at one of the libraries in Raleigh, NC. Her husband Steve, who took the photo, was also there tatting. The librarian counted 69 visitors to our event during the hour and a half that we were there.

This is the third fiber craft demo I've participated in this fall: 2 for tatting and 1 for crochet. The crochet event was especially satisfying due to the number of children who tried their hands at making chains. A couple of kids even took home yards of yarn that I gave them so they could continue to practice at home. I hope they grow up to be passionate about thread and yarn as I am.

Tuesday, October 25, 2016

2016 State Fair Awards


 This year I entered eight pieces in the 2016 North Carolina State Fair and won ribbons on all of them.


Department:   Home Furnishings 
Class:  103  Non-Threaded Needlecraft 
Lot:  00066  Bobbin Lace,Tatting:on item
First Place -- $15.00 premium


Department:   Home Furnishings 
Class:  103  Non-Threaded Needlecraft 
Lot:  00044  Crocheted edging/insertion
1st place -- $25.00


Department:   Clothing 
Class:  101  Adult Clothing Construction 
Lot:  00100  Tatting Trim
2nd place -- $7.00 premium


Department:   Clothing
Class:  103  Adult Hand Crafted Items 
Lot:  00169  Hand Crochet:Christening Gown
2nd place -- $13 premium


Department:   Clothing 
Class:  103  Adult Hand Crafted Items 
Lot:  00172  Hand Crocheted:Baby Sweater
2nd place -- $8.00 premium


Department:   Breads,Cakes,Cookies,Candies 
Class:  104  Cookies 
Lot:  02373  Biscotti - any type (9)
2nd place -- $10.00 premium


Department:   Home Furnishings 
Class:  103  Non-Threaded Needlecraft 
Lot:  00058  Hand Knit-edging/insertion
3rd place -- $10.00 premium


Department:   Clothing 
Class:  103  Adult Hand Crafted Items 
Lot:  00164  Hand Knitted:Item by Knitter
Honorable Mention


Thursday, October 13, 2016

Little Hearts for Little Kids


Next month, as part of a local fiber arts group, I will be representing crocheting at one our county libraries along with spinners, knitters, weavers, felters, and bobbin lacers. In addition to demonstrating and displaying crocheted work, I will pass out some of these 50 little yarn hearts that I just finished to the children who attend the event. Our local library system has been a great supporter of handcrafts by offering display case space and setting up demonstrations at times when children come to the library for story time.

These little hearts work up super fast; that's why making 50 of them didn't take very long. I got the pattern from this YouTube video: https://m.youtube.com/watch?v=3P45Gg8Pemw, but similar patterns can be found on other sites. What I like about this version is that you start with a chain and put the first treble stitch into the first chain stitch (rather than starting by making a "magic circle") -- a method that, for me, gets me going much faster.

Saturday, October 8, 2016

2016 NC State Fair Project: Tatted Edging on Vintage Handkerchief


Here's the handkerchief with a tatted edging that I entered in this year's NC State Fair. The handkerchief is from my vintage hanky stash. It's embellished with a small applique and some pulled thread embroidery. 

The thread is size 70 vintage thread in green and lavender. My use of the green thread resulted in a "thread emergency" when I realized that I might not have enough to finish the final row. And since it was a discontinued vintage thread, good luck with finding more of it. Note to self: don't start a big project when you only have a small amount of vintage thread...and one ball is a very small amount to have for a hanky edging.

 I put out a call on the Tatting Facebook group to see if anyone had a ball of American Thread Co. Star Tatting Crochet thread (Art. 25) in size 70 and color 149 (a light green), A wonderful woman in Missouri helped me out, asking for something I tatted rather than any money. The thread was a perfect match, and I was able to finish the piece after all. 

I think the pattern is based on "Edging 13" by Barbara Foster in Embellishing with Edgings (Handy Hands, 2011, p. 23). I say that because, stupidly, I did not record the pattern when I finished and several months have passed. I went through all my tatting patterns and couldn't find anything that totally matched what I had tatted. The second row looks a lot like Barbara's pattern, but the first row does not. Maybe some day I'll discover exactly what pattern I used. Maybe some day I'll remember to record details about my projects before I forget them.


2016 NC State Fair Project: Tatted Edging on Pillowcase


I entered this tatted pillowcase edging in this year's NC State Fair. The pattern is "861" from Tatting, Book No. 141, published by The Spool Cotton Company (1939, p. 21) and is also "861" in Imported Designs of Tatting, Book 77 (p. 10) by the same publisher. The pattern is also available online at http://www.bellaonline.com/articles/art300897.asp.

The thread is Lizbeth size 20 in color #124 "Spring Garden" and color #680 "Spring Green."


2016 NC State Fair Projects: Cookie Fail, Cookie Succeed

As my cookie-eating friends know, I am big on baking biscotti of all kinds. So when I saw at last year's North Carolina State Fair that there was a biscotti category in the baked goods section, I decided to enter a batch in this year's fair.

Although using an original recipe is not a requirement, I thought I would make something that I came up with a few years ago -- Caramel Apple Biscotti (recipe is at the end of this blog post). Below is a photo of the end result: very tasty, but aesthetically lacking something. I call this a "cookie fail" only because of the appearance. They don't slice up neatly because of the apple pieces, and they are soft and moist so the slices don't all stay intact. Of course, for a fair entry the look is going to count for something. Once the cookies are in the display case, fair visitors will only have the appearance to judge by, and, honestly, these biscotti aren't beautiful.


Fortunately, I had plenty of time for a do-over before the entry deadline. I turned to one of my favorite cookie cookbooks, Sweet Maria's Italian Cookie Tray by Maria Bruscino Sanchez (St. Martin's Press, 1997). I've made her Coconut Biscotti recipe before, knew it made a good cookie, and I had all the ingredients on hand. So moving on that night, I made a batch, finished the first baking, and left the cookie logs to cool overnight. Next morning I sliced and completed the second baking. 

Below is a photo of the final results: uniform in size and brownness, crisp and holding their shape. Perhaps not as flavorful as the Caramel Apple, but still a good example of what people expect to see in traditional biscotti. And I'm not knocking their taste. They have a nice coconut flavor with a hint of butter that makes them excellent with tea or coffee. They're one of my favorites for my annual cookie party. I deem them "cookie success" because they not only taste good, but they look good too, which is a goal I wanted to meet for a fair entry. So we'll see how the judges like them. 


So what became of the rejected Caramel Apple Biscotti? When I worked in IT at UNC-Chapel Hill, I never had a problem getting rid of excess goodies. (There's a belief that IT guys are always hungry and will eat just about anything, especially if it's homemade and free.) Now that I'm retired I volunteer at the Ten Thousand Villages store here in Cary. So I boxed up all the "failed" biscotti and took them to the store for the staff and volunteers. I got a nice email from the director today saying they are enjoying them on this dreary day. (Although Cary is far from the NC coast, we are getting a lot of Hurricane Matthew rain and high winds today, and some road flooding is occurring.) So all the biscotti baking turned out to be successful in the end.

Here's the recipe for the "failed cookies":

Carolyn's Caramel Apple Biscotti

½ cup (1 stick) butter, softened
1 cup sugar
2 eggs
1 teaspoon vanilla
2 ½ cups plain flour
1 ½ teaspoons baking powder
¼ teaspoon salt
2 teaspoons ground cinnamon, divided
1 cup chopped dried apple pieces
1 cup caramel chips

Apple pieces preparation:
Soak pieces 1½ - 2 cups of boiling water mixed with 1 teaspoon cinnamon until the apple pieces are softened. Set aside.

Preheat oven at 325 degrees. Lightly grease a cookie sheet or line with parchment paper.

Beat butter and sugar until well blended.

Add eggs and vanilla. Beat till all blended.

Sift flour, baking powder, salt, and 1 teaspoon of cinnamon.

Gradually add the flour mixture to the butter mixture until smooth. Dough will be stiff.

Drain the apple pieces, discarding the liquid. Stir in the apple pieces and  the caramel chips into the dough.

Divide the dough in half and shape into 2 logs about 8-10 inches long. Place on the cookie sheet and flatten slightly.

Bake 20-30 minutes or until the logs are done (toothpick inserted in the log center will come out clean).

Remove from oven and let cool cool completely on a wire rack.

Transfer to a cutting board. Using a serrated-edge knife, cut the logs diagonally into ½-inch slices. Slices will be sticky so use a sawing motion to minimize breaking the slices into pieces.

Place slices cut side down on an ungreased cookie sheet or lined with parchment paper. Return to oven and bake 5-6 minutes. Turn slices on other side and bake for an additional 5-8 minutes. Cookies should be lightly browned on each cut side.

WARNING: be careful when handling and turning hot cookies. Melted caramel pieces are very hot and sticky and can cause a painful burn.

Remove from oven and place on a wire rack to cool completely.

These biscotti are softer and moister than traditional biscotti so handle gently.

For fancier biscotti, you can melt some caramel pieces (¼ cup) with a small amount of shortening (1 tsp) to make a caramel drizzle. 


Friday, October 7, 2016

2016 NC State Fair Projects: Knitted Edging on Tea Towel


This is my second year of entering a piece in the knitted trim on household item category in the North Carolina State Fair. Last year I was truly surprised to get a blue ribbon for my entry. I wonder if it was just that perhaps more people do thread crochet rather than thread knitting and so there are fewer entries and less competition. 

I'm a volunteer at the Ten Thousand Villages store in Cary, NC, where I bought this tea towel last year. As soon as I saw it, I knew I would use it for a fair entry. The color and statement called for something "Christmasy" so I looked for a pattern that might evoke Christmas trees.


The pattern I chose sort of looks like upside-down trees with red beads at their peaks. The pattern is "Cinquefoil" from 150 Knitted Trims by Lesley Stanfield (St. Martin's Griffin, 2007; p. 86). I used green size 10 crochet cotton from my stash with a size 0 needle. I strung the red glass beads on the thread before knitting the trim. I think this little edging does add to the message "Make Merry."

2016 NC State Fair Project: Crocheted Edging on Tea Towel


This is the first time I've entered a piece in the NC State Fair category for crocheted trim on a household item. As you can see, the tea towel's design was my inspiration for the edging. I liked the idea of echoing the white dots on the towel with white and red disks in the edging.


The piece is a combination of elements from two patterns. The solid red heart shapes are from pattern "#15" from 111 Easy Edgings by Terry Kimbrough (Leisure Arts, 1997; p. 10). The disks are from pattern "#116" in Around the Corner Crochet Borders by Edie Eckman (Storey Publishing, 2010; p. 236).

I used size 10 red and white crochet cotton with a size 6 steel crochet hook. Each disk was crocheted separately and then sewed to the red edging which had already been sewn onto to the towel. 


2016 NC State Fair Project: Baby Christening Gown


This year I put an entry in the Crocheted Christening Gown category at the North Carolina State Fair. The pattern is "Offset Shell," one of two patterns in the Leisure Arts brochure Christening Sets to Crochet by Kay Meadors (2007, p. 7-9). 


I used Lily 18th Century white cotton thread, a thread that has been discontinued. (I seem to have a lot of discontinued threads and yarns in my stash.) This thread crocheted up very nicely using a size 6 steel crochet hook.


The final gown is about 18" long. I kept thinking I should go longer even though the pattern specified only 15" for the longer version. But with the fair entering deadline looming, and, frankly, me wanting to move on to other projects, I added the bottom edging last night and called it finished. 

The pattern calls for three buttons and I found an old card of three white glass heart-shaped buttons in my button stash that were perfect. The pattern photograph showed using a white ribbon trim, but I ended with a peach ribbon simply because that was what I had in the length I needed -- and I wanted to avoid a last minute trip to Jo-Ann's for white ribbon. So everything I used (thread, ribbon, buttons) came from my stash. Sometimes I have to agree with my daughter that I do, indeed, have a craft shop in my house.

Thursday, August 4, 2016

My First Knitting Pattern on Ravelry


If you are on Ravelry, look for my "Squiggle Scarf" pattern, a knitted scarf that I designed and will be entering in the North Carolina State Fair. A PDF of the pattern is also here on my blog in the "Patterns" page section. This is my first ever knitting design, and I can't wait to see how it does in the designer knitting category. The scarf is fun to knit, but I learned that even a simple pattern is hard to write clearly and accurately.

Wednesday, August 3, 2016

Thread Fail #1 Continued

Ok, I give up! I've tried putting my bleeding red edging through many, many soakings of vinegar with and without water, with and without salt. Also doused the water with the cleaner that takes stains out of old textiles. After all this and going through about a quart of white vinegar, there is still a small amount of dye bleeding out...unbelievable. This is worse than what I went through with setting dye in the turquoise and teal shawl I made last year. Straight vinegar and lots of it finally fixed that shawl, but this red thread has me defeated.

Luckily, I have another ball of size 10 red cotton thread on hand that looks slightly different. But expecting the same dye problem, I wet a sample of this thread and laid it on a paper towel to see if the dye would bleed out. No, nothing but wet paper towel. So I am going to redo the project using this batch of thread. The redo should go faster since I've already had a "practice run" of the pattern with the bleeding thread.

As for the first ball of thread...it's in the trash. Even though there was a lot of yardage left on the spool, I couldn't bear the thought of anyone else being cursed with this awful stuff. I just wish I still had its label so I would know what brand to avoid in the future. But since I acquired this thread in the 1990s, I'm thinking maybe this thread is no longer manufactured and that's a very good thing.

Tuesday, August 2, 2016

2016 NC State Fair Projects: Thread Fail #2

Are we seeing a pattern here?

Ok, this time the thread fail was all my fault. One of my fair entries will be a tatted edging on a vintage handkerchief using two colors of vintage size 70/80 thread. I was tatting away until the the shuttle with green thread ran out. Blithely, I filled the shuttle with all that remained on the spool and tatted onward. Not long after, it occurred to me that that was all the thread I had left in that brand/color/size. And that I just might not have enough thread on my shuttle to finish making it around the hanky circumference. As I watched more thread unspool from the shuttle and more of the shuttle's post being emptied, I started getting tenser. I was on round 2 of the edging with about 6 inches to go and, wouldn't you know, the green was being used up quickly for all the rings while the lavender, which I still had a lot of, was only used for some short chains. 

If I could only find just one more small spool of the green thread, the project would be saved. Of course, it being a discontinued, vintage thread (American Thread Co. Star Tatting Crochet thread (Art. 25) in size 70 and color 149), finding more was not going to be easy. First I did searches in eBay, Etsy, Google, and Ravelry. The only thing I turned up was someone on Ravelry who had a spool of it in her stash, but was not offering it for sale or trade. Nevertheless, I kept this source in mind on the chance that I might be able to convince her with my pitiful story to part with it.

Next I resorted to posting my dilemma to the Tatting Facebook group, offering to buy or trade from anyone who might have this thread in their stash. In addition to a lot of sympathetic comments ("we've all been there"), I also (hooray!) eventually got offers from three tatters who said they had that thread. I contacted the first to respond, a tatter in Missouri, who didn't want any money or even reimbursement of her postage. She asked that I just send her something I'd tatted. Within a couple of days, her thread arrived and I was able to complete the project! (I hope she likes what I sent her as a thank you.)

I am so grateful for all the generosity that tatters online have for each other. They really came through for this tatter, and I hope that someday I can help out someone else who has a vintage thread emergency. (It's not like I'll ever be able to use up all that tiny thread that I have stashed anyway.)

2016 NC State Fair Projects: Thread Fail #1


For the past few weeks I've been working on entries for this year's state fair. One of the projects is a crocheted edging attached to a tea towel. The towel has a cookie recipe decorated with large red dots. My idea was to crochet a base edging and then echo the dot motif with crochet disks. I crocheted 11 disks and yesterday wet blocked them to reduce any cupping and flatten them out. When I checked to see if they were dry enough to attach to the base edging, I saw that the red thread had bled into the white, making an uneven ring of pinky white...not the effect that I wanted to achieve.

I've accrued a sizable stash of size 10 crochet threads over the years (it's the size I first learned to tat on back in the 1990s), and, as far as I can recall, most of the labels state that the thread is "colorfast," i.e., the dye will not run or bleed. I've attached motifs made with these threads to clothing and never had a problem with dye bleeding. But somehow this ball of red thread does indeed bleed, and the resulting pieces made with it are unusable for my entry.

Since the tea towel that I'm using is mostly white, if I ever plan to use it as intended, I can't risk having dye from the red thread ruining it. So right now I'm soaking the red base edging in white vinegar in the hopes of setting the dye. I'm also soaking several additional yards of red thread so that I can make new disks that won't bleed. Fortunately, redoing this part of the project won't entail too much more of my time, but this is so disappointing! I realize that red dyes can be notorious for having dye bleeding problems, but --mistakenly-- I assumed that the crochet thread I was using would not be a problem. Now, before using any of the colored thread in my crochet cotton stash, I think I'll do a test of the color fastness regardless of what color the thread is. And maybe it's time to replace that ball of red thread with a newer ball that explicitly says it's "colorfast."

Saturday, July 9, 2016

2016 NC State Fair Projects: Crocheted Baby Sweater


This is my 3rd year to enter items in the North Carolina State Fair. Last year I got a 2nd prize for a crocheted baby sweater so I decided to enter this category again. 

The pattern started out as "Karen's X Stitch Sweater." I followed the pattern through Row 8; Row 9 begins the X stitch pattern. After doing the pattern for a few inches, I decided (1) I didn't like doing the stitches (too fiddly for my taste), (2) I didn't like the look of the stitches (too much effort for the results), and (3) even if (1) and (2) weren't the case, any distinctiveness of the stitches was lost in the busyness of the yarn textures and colors...so what was the point? So starting at Row 9 I changed the X stitch to the V stitch that was presented in Row 6. 


This brings up an interesting situation. In the state fair's competition categories, there is a separate category for items that are the maker's own pattern. At what point does a change in someone else's pattern make the pattern more yours than theirs? 

One of the requirements when submitting an item in the clothing contest is to include the name of the pattern on your entry form. How do I handle this case? Do I say it's Karen's pattern until Row 9 (plus the last 3 rows of the sleeves)? Is it a hybrid pattern of Karen's and Carolyn's design? Hmmm...I may have to contact the judging office on this one.

The sweater took less than one skein of Stitch Studio by Nicole's "Picnic" in variegated colorway "Strawberry." It's a 100% acrylic yarn that is soft and squishy that makes it a good choice for baby items. The yarn label suggests using size G/6 crochet hook, but I used a size F/5 instead. The original pattern calls for making a yarn tie and inserting it into spaces around the neck area as a closure. Instead, I included two chain-4 loops on the right edge and sewed two red plastic heart buttons on the left side to close the sweater.


Friday, July 1, 2016

Off the Stove: Eggrolls


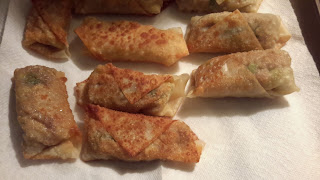
Usually my posts deal with fiber projects, but today's is a culinary project -- homemade eggrolls. I haven't made them for years, but this week I got the urge. And they turned out just as easy and delicious as I remember.


For the meat I used a small chunk of pork roast cut in very small pieces. The rest of the filling included bean sprouts, chopped cabbage, sliced spring onions, chopped carrots, pickled ginger pieces, and soy sauce mixed with a little cornstarch. The eggroll wrappers came from my usual grocery store. Mix everything together, sauté for a couple of minutes, and fill the wrappers according to the package instructions.

I fried them in a shallow amount of coconut oil until both sides were browned then drained them on paper towels. The package of wrappers made 20 eggrolls. I had more filling left which I'll probably eat later with rice.

Ta-da! Ready to enjoy:

Thursday, June 16, 2016

Still on the Hook: Crocheted Christening Gown


I'm about halfway through a piece I plan to enter in the 2016 North Carolina State Fair in October--a white cotton thread crocheted christening gown. The pattern I'm using is for the gown on the cover of Christening Sets to Crochet by Kay Meadors.


I'm using Lily 18th Century 100% Mercerized Crochet & Bedspread Cotton that I found in my stash. I think it's size 10, but it feels softer than the size 10 balls of Knit-Cro-Sheen I have stashed.

Not sure when or how I acquired it as the thread has been discontinued. The labels say the skeins were bought at Woolworth's for $2.79 each; it's been many years since I have shopped there.


I still have to reach my desired length, add sleeves, make the buttonhole band, and add buttons. I have 3 skeins and each skein has 450 yards. I'm on my second skein so should have plenty of thread to finish the project. 


Monday, May 23, 2016

Off the Needles: 2 Little Lacy Scarves


More using up my stash, this time knitting up some small amounts of yarn that I bought at past fiber events.

Little lace scarf 1:


I started knitting this lace pattern scarf over a year ago, made some mistakes, and put it aside. Last week, I determined to finally finish it. I've mislaid the identifying label, but, based on the feel of the beige yarn, I think it's a natural color alpaca, probably purchased at a past Carolina Fiber Fest event.


The asymmetrical lace pattern is "Juliet Scarf" from Knitting Little Luxuries by Louisa Harding (Interweave Press, 2007, pgs. 80-3). The finished piece blocks out at 5in/13cm wide by 36in/91cm long.


Little lace scarf 2:


This scarf is knitted from 2 skeins of hand-dyed angora rabbit yarn (106 yarns total) that I bought a couple of years ago at Carolina Fiber Fest from Marlene Cicalese. She hand-dyes and spins fiber taken from her angora rabbits. She sells her yarn online at www.angoraonline.com. The blue shades are mixed with purples to create a fluffy thick and thin yarn.


The pattern is adapted from the "Raindrop Scarf" pattern by Laura Hein Eckel in Lace One-Skein Wonders, edited by Judith Durant (Storey Publishing, 2013, pgs. 152-3). I cast on fewer stitches and used only one repeat of the motif so the finished scarf is about half the width of but about 14 inches longer than the original pattern.The finished scarf is 3.25in/8cm wide and 54in/137cm long.